


- Joined
- Oct 15, 2019
- Messages
- 1,610
One of the things I'm planning to do in 2022 that I haven’t done before is promoting my own email subscription offer so that I can experiment with running some email marketing campaigns. I'm using AWeber for email and in this guide, I'm going to walk through the process of setting things up over there.

There are a BUNCH of different email providers you could turn to for an email marketing campaign, including hosting your own email servers. And if you're looking to go with something a bit more custom, then have a look at what @Varun has written on the forum about using Sendy as somewhere to get you started:
 afflift.com
 afflift.com
I’m using AWeber as opposed to any of the others because I've used them before and know what I'm doing over there so it was just a go-to option for getting started quickly to test things out. (I was also considering using GetResponse because I've also used them before and really like their platform, but I just decided to start somewhere and AWeber's what I chose).

Creating a list is a pretty easy process, but there are a few steps involved to tick all the boxes.
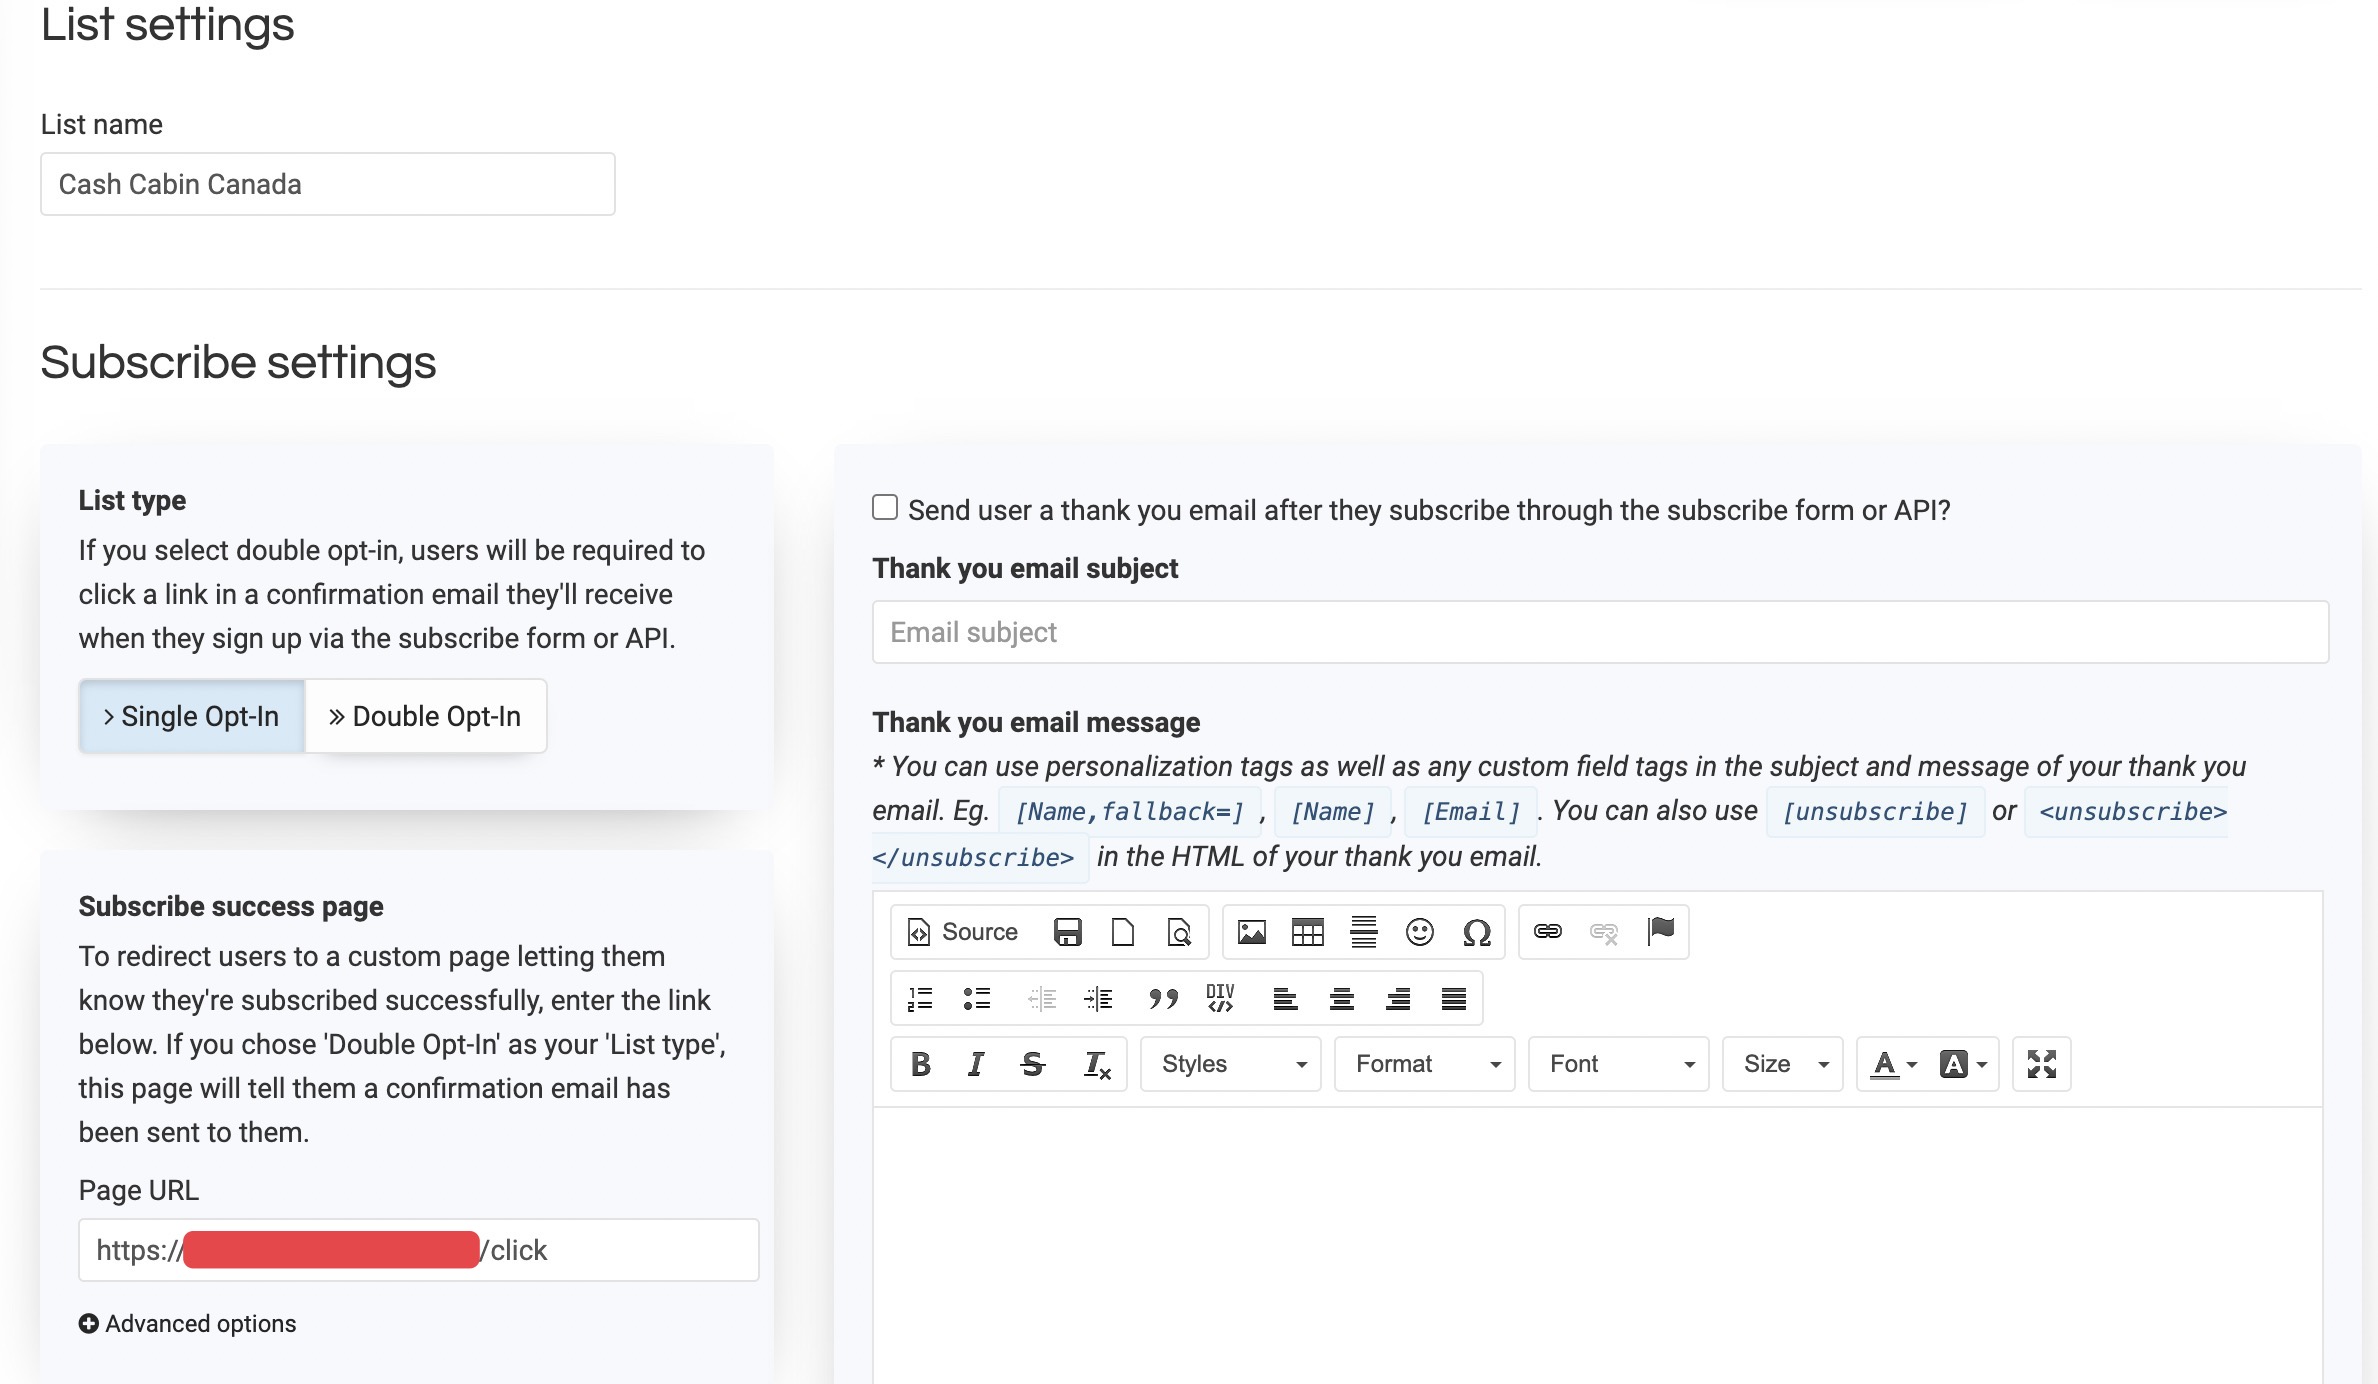
First, you'll need to enter some basic settings, like your list name and description and the name and email address you want to send emails from (you'll need to add and verify an actual email address to use it for these settings).

Then you'll have to enter a contact address and an email address to receive notifications about new subscribers. And you can set up an email signature and branding to insert into messages and landing pages, as well as connect your socials.
FYI: If you want some step-by-steps for setting up an email address to use with AWeber, I've got you covered:
 afflift.com
Then the last thing you have to do to get your list set up is create the confirmation message AWeber will send if you’re using double-opt-in and the confirmation page subscribers will be redirected to when they confirm.

And that’s it – you’ve got a new list set up and ready for your first sign-up form.
Step 2: Create a new sign-up form
To be able to ask people to subscribe to your list you’re going to need a sign-up form. Setting this us is really easy, but I’ll also point out a few tricks.
Aweber has 2 ways to create a sign-up form: on a landing page or for my website.

In this case, the ‘On a Landing Page’ option doesn’t refer to a self-hosted landing page you might be creating and hosting on your own server. If you want a sign-up form for this kind of landing page you need the ‘For My Website’ option.
In Aweber, the ‘On a Landing Page’ option refers to a landing page you can create on their platform, that they’ll host for you. And while we’re talking about this option, let’s have a look at the process a bit closer.
Creating a Landing Page
To start creating a sign-up form on a landing page, you’ll need to choose a template you like. There are heaps to choose from, but don’t get too hung up on the ‘perfect’ option – you can edit everything in a drag-and-drop editor once you’ve made your initial choice, so your final landing page can look the same or totally different to the template you start with.
I think a good all-purpose template with a clean single column structure is the ‘Sell Exclusive Content’ template. It’s not set up with an email form, but it’s really easy to customize and add one with the drag-and-drop editor.


(This literally took me about 20 minutes, including creating the logo. It’s really easy!)

Now you can save it and click publish and your landing page will be live (hosted by Aweber). And if you want to add a custom domain or subdomain so you don’t have your lander hosted on a domain like “mylist.aweb.page/p/13246843c-62g8-2a89-4e6u-a8e112375015”. Otherwise, if you want to keep everything on your own site without Aweber hosting your form for you, you can create a form for your own website.
Creating a Form for your Website
Like with the landing page set-up, you can start creating a form for your website by using one of AWeber’s templates, then using the easy editor to customize it.


And because I didn’t have to think about anything this time, I got this done in less than 5 minutes.

P.S. One thing I really like about AWeber is that they have a huge library of tutorials and a massive YouTube channel, so if you're ever looking for more instruction than the basics I've gone over in this guide, you're all set!
Step 3: Create a campaign
Once you’ve got a list and a sign-up form ready to go, you can start creating your first campaign. This means you’re going to create a series of emails to start sending to people who subscribe to your list. (This is often called an autoresponder series).

From the screenshot above you can see the first steps I’m taking to create a new campaign, which involves adding a new campaign to my campaign list, then adding a trigger, tags, messages, and rules.
Trigger: The trigger is set to start my campaign ‘on subscribe’ for ‘new subscribers’. This is probably the most basic rule for any campaign, particularly a welcome series like the one I’m writing here. But you could have follow-on campaigns that might be triggered by a subscriber finishing a welcome series or taking some particular action, like purchasing a product.
Tags: Tags are something you can get the software to add to your campaign at certain times, depending on some action or condition. For example, in the campaign I’m setting up below, I’m adding a few tags right at the start – ‘new-subscriber’, ‘no-opens’ and ‘no-clicks’. These are default tags for this campaign, which I expect to replace with different tags as subscribers progress (e.g. replace no-opens, with ‘opened’ when a subscriber opens their first email). I can use tags in reports or also as triggers for new campaigns (e.g. if after 5 emails have been sent and the subscriber still has the tag ‘no-opens’, I can create a trigger for a campaign to offer a new incentive to open).
Messages: It’s pretty self-explanatory that messages are the emails I’ll be sending in my campaign. I’ll write more about this in a minute.
Rules: The most basic rule is about the timing of emails. In this campaign I have a rule after the first message is sent to wait one day before doing anything else. After that rule, I’ll probably add another message, then another rule to wait, another message etc.
Creating email messages
You can create email messages as you build a campaign, or you can write them independently and then slot them into a campaign (or multiple campaigns) as you see fit. It really doesn’t matter how you go about it because the process is pretty much the same either way.
To create a new message from the campaigns menu, click on the campaign name to go into the campaign settings, then drag the ‘Send a Message’ action down to the bottom of the campaign. This will then trigger an option to choose a message (if you’ve pre-written some emails) or create a new message, which you can do with the drag and drop builder, or using the plain text or HTML editors.

For this example, I’m going to create a new message with the drag & drop, starting with one of Aweber’s free templates - survey.

Now, I’m not going to give you a tutorial on how the different elements of the drag and drop builder work – Aweber do a much better job of covering that in their tutorials that I would be able to do here, so just refer to those. But, in a nutshell – the drag and drop builder just makes it super easy to add elements like images, text boxes and buttons etc to your email template.
Then all you have to do is write your message.
Step 4: Create your own website (e.g. pre-landing page) with a subscription form
This step is one that you might be able to do better than me if you have coding experience. But I’m going to assume you don’t have much of an understanding of HTML, CSS or Javascript and just lead you through a few pointers on how you can create your own email subscriber form on your own website.
There are many ways you can create landing pages with an email form by using a pre-made template. You could rip a landing page from a spy tool or grab a template from somewhere like PureLander. In terms of setting up your template, I’m going to let you refer to the source of your template for instructions on how it works.
What you need to do as part of the form set up is make sure you have the Aweber form code properly installed where the submission is going to take place on your lander.
This is what the form code looks like:
Step 5: Set up the form code to pass subs to AWeber
The last step of the process is to add the values you’ll need to make sure the code above links to YOUR Aweber account and list. And to do this, you’ll need to go back to your forms in your dashboard and proceed back to the third step in the form creation process (for a form you’ve already created, or a new form). When you get to this step you’ll see 2 options to publish the form and choose ‘I will install my form’.

Then you need to choose ‘Raw HTML Version’ and uncheck the ‘Include beautiful form styles’ option.

Now you can copy-paste from <form> to </form> if you want to be safe (then edit for your own website style later). Alternatively, I think it’s easier to just copy-paste the values required for this particular campaign, which will be included in the Aweber code you copy at this stage.
AND THAT’S IT BABY!

You should now have a fully functioning email form on your pre-landing page, ready to collect those high value subscribers. Just make sure you test it by subscribing and you should be good to go!
There are a BUNCH of different email providers you could turn to for an email marketing campaign, including hosting your own email servers. And if you're looking to go with something a bit more custom, then have a look at what @Varun has written on the forum about using Sendy as somewhere to get you started:
Sendy Installation Guide
afflift.com
Connecting your landing pages to Sendy
afflift.com
I’m using AWeber as opposed to any of the others because I've used them before and know what I'm doing over there so it was just a go-to option for getting started quickly to test things out. (I was also considering using GetResponse because I've also used them before and really like their platform, but I just decided to start somewhere and AWeber's what I chose).
Setting up your first email campaign
I'm going to skip the account creation process and a few of the more basic (and obvious) steps on the way because I think you can handle that stuff. Otherwise, here are the 5 basic steps you'll need to follow to set up your first campaign:- Create a list
- Create a sign-up form
- Create a campaign
- Create a landing page with a form
- Set up the form code to pass subs to AWeber
Creating a list is a pretty easy process, but there are a few steps involved to tick all the boxes.
First, you'll need to enter some basic settings, like your list name and description and the name and email address you want to send emails from (you'll need to add and verify an actual email address to use it for these settings).
Then you'll have to enter a contact address and an email address to receive notifications about new subscribers. And you can set up an email signature and branding to insert into messages and landing pages, as well as connect your socials.
FYI: If you want some step-by-steps for setting up an email address to use with AWeber, I've got you covered:
Linking NameCheap Private Email to AWeber
afflift.com
Then the last thing you have to do to get your list set up is create the confirmation message AWeber will send if you’re using double-opt-in and the confirmation page subscribers will be redirected to when they confirm.
And that’s it – you’ve got a new list set up and ready for your first sign-up form.
Step 2: Create a new sign-up form
To be able to ask people to subscribe to your list you’re going to need a sign-up form. Setting this us is really easy, but I’ll also point out a few tricks.
Aweber has 2 ways to create a sign-up form: on a landing page or for my website.
In this case, the ‘On a Landing Page’ option doesn’t refer to a self-hosted landing page you might be creating and hosting on your own server. If you want a sign-up form for this kind of landing page you need the ‘For My Website’ option.
In Aweber, the ‘On a Landing Page’ option refers to a landing page you can create on their platform, that they’ll host for you. And while we’re talking about this option, let’s have a look at the process a bit closer.
Creating a Landing Page
To start creating a sign-up form on a landing page, you’ll need to choose a template you like. There are heaps to choose from, but don’t get too hung up on the ‘perfect’ option – you can edit everything in a drag-and-drop editor once you’ve made your initial choice, so your final landing page can look the same or totally different to the template you start with.
I think a good all-purpose template with a clean single column structure is the ‘Sell Exclusive Content’ template. It’s not set up with an email form, but it’s really easy to customize and add one with the drag-and-drop editor.
(This literally took me about 20 minutes, including creating the logo. It’s really easy!)
Now you can save it and click publish and your landing page will be live (hosted by Aweber). And if you want to add a custom domain or subdomain so you don’t have your lander hosted on a domain like “mylist.aweb.page/p/13246843c-62g8-2a89-4e6u-a8e112375015”. Otherwise, if you want to keep everything on your own site without Aweber hosting your form for you, you can create a form for your own website.
Creating a Form for your Website
Like with the landing page set-up, you can start creating a form for your website by using one of AWeber’s templates, then using the easy editor to customize it.
And because I didn’t have to think about anything this time, I got this done in less than 5 minutes.
P.S. One thing I really like about AWeber is that they have a huge library of tutorials and a massive YouTube channel, so if you're ever looking for more instruction than the basics I've gone over in this guide, you're all set!
Step 3: Create a campaign
Once you’ve got a list and a sign-up form ready to go, you can start creating your first campaign. This means you’re going to create a series of emails to start sending to people who subscribe to your list. (This is often called an autoresponder series).
From the screenshot above you can see the first steps I’m taking to create a new campaign, which involves adding a new campaign to my campaign list, then adding a trigger, tags, messages, and rules.
Trigger: The trigger is set to start my campaign ‘on subscribe’ for ‘new subscribers’. This is probably the most basic rule for any campaign, particularly a welcome series like the one I’m writing here. But you could have follow-on campaigns that might be triggered by a subscriber finishing a welcome series or taking some particular action, like purchasing a product.
Tags: Tags are something you can get the software to add to your campaign at certain times, depending on some action or condition. For example, in the campaign I’m setting up below, I’m adding a few tags right at the start – ‘new-subscriber’, ‘no-opens’ and ‘no-clicks’. These are default tags for this campaign, which I expect to replace with different tags as subscribers progress (e.g. replace no-opens, with ‘opened’ when a subscriber opens their first email). I can use tags in reports or also as triggers for new campaigns (e.g. if after 5 emails have been sent and the subscriber still has the tag ‘no-opens’, I can create a trigger for a campaign to offer a new incentive to open).
Messages: It’s pretty self-explanatory that messages are the emails I’ll be sending in my campaign. I’ll write more about this in a minute.
Rules: The most basic rule is about the timing of emails. In this campaign I have a rule after the first message is sent to wait one day before doing anything else. After that rule, I’ll probably add another message, then another rule to wait, another message etc.
Creating email messages
You can create email messages as you build a campaign, or you can write them independently and then slot them into a campaign (or multiple campaigns) as you see fit. It really doesn’t matter how you go about it because the process is pretty much the same either way.
To create a new message from the campaigns menu, click on the campaign name to go into the campaign settings, then drag the ‘Send a Message’ action down to the bottom of the campaign. This will then trigger an option to choose a message (if you’ve pre-written some emails) or create a new message, which you can do with the drag and drop builder, or using the plain text or HTML editors.
For this example, I’m going to create a new message with the drag & drop, starting with one of Aweber’s free templates - survey.
Now, I’m not going to give you a tutorial on how the different elements of the drag and drop builder work – Aweber do a much better job of covering that in their tutorials that I would be able to do here, so just refer to those. But, in a nutshell – the drag and drop builder just makes it super easy to add elements like images, text boxes and buttons etc to your email template.
Then all you have to do is write your message.
Step 4: Create your own website (e.g. pre-landing page) with a subscription form
This step is one that you might be able to do better than me if you have coding experience. But I’m going to assume you don’t have much of an understanding of HTML, CSS or Javascript and just lead you through a few pointers on how you can create your own email subscriber form on your own website.
There are many ways you can create landing pages with an email form by using a pre-made template. You could rip a landing page from a spy tool or grab a template from somewhere like PureLander. In terms of setting up your template, I’m going to let you refer to the source of your template for instructions on how it works.
What you need to do as part of the form set up is make sure you have the Aweber form code properly installed where the submission is going to take place on your lander.
This is what the form code looks like:
HTML:
<form method="post" accept-charset="UTF-8" action="https://www.aweber.com/scripts/addlead.pl">
<p>Enter your email address in the box below, click the button, and get the *FREE* MegaSpin Mastery Guide sent to your inbox today!</p>
<div style="display: none;">
<input type="hidden" name="meta_web_form_id" value="" />
<input type="hidden" name="meta_split_id" value="" />
<input type="hidden" name="listname" value="" />
<input type="hidden" name="redirect" value="" id="" />
<input type="hidden" name="meta_redirect_onlist" value="" id="awonlist" />
<input type="hidden" name="meta_adtracking" value="Basic_form" />
<input type="hidden" name="meta_message" value="1" />
<input type="hidden" name="meta_required" value="email" />
<input type="hidden" name="meta_forward_vars" value="1" />
<input type="hidden" name="meta_tooltip" value="" />
</div>
<input class="text" id="" type="text" name="email" value="" tabindex="500" onfocus=" if (this.value == '') { this.value = ''; }" onblur="if (this.value == '') { this.value='';} " pattern=".+@.+\..+" placeholder="[email protected]" required />
<input type="submit" name="submit" class="submit" value="GET MEGASPIN MASTERY TODAY »" tabindex="503" />
<img type="secure" src="securemailop.png" alt="Secure and SPAM free email subscription service. Unsubscribe from any email, any time, with one click.">
</form>Step 5: Set up the form code to pass subs to AWeber
The last step of the process is to add the values you’ll need to make sure the code above links to YOUR Aweber account and list. And to do this, you’ll need to go back to your forms in your dashboard and proceed back to the third step in the form creation process (for a form you’ve already created, or a new form). When you get to this step you’ll see 2 options to publish the form and choose ‘I will install my form’.
Then you need to choose ‘Raw HTML Version’ and uncheck the ‘Include beautiful form styles’ option.
Now you can copy-paste from <form> to </form> if you want to be safe (then edit for your own website style later). Alternatively, I think it’s easier to just copy-paste the values required for this particular campaign, which will be included in the Aweber code you copy at this stage.
AND THAT’S IT BABY!
You should now have a fully functioning email form on your pre-landing page, ready to collect those high value subscribers. Just make sure you test it by subscribing and you should be good to go!
Last edited:

 ). It can be a super powerful tool if you use it right!


