

- Joined
- May 7, 2018
- Messages
- 5,377
A popular post of mine here on the forum is about using Netlify with Cloudflare to host your landing pages for free. They’re fast, and using the user interface(s) is relatively easy.
That’s great, but what if I told you it can get even better?
In this thread, I’m going to show you how you can add Github into the mix, allowing you to never have to visit Netlify (or Cloudflare) when you change or upload new files.

When I say project, I mean the main folder that holds all of your landing pages. This main folder can have one folder with a landing page as I have, or literally hundreds of folders each containing a different landing page. The choice is yours.
Now we’re ready to turn this folder into a Git repository.
With your project open, in the main menu of VS Code:

Your main window should split and you should see the terminal:

If you look at the text in the terminal, it says blurry stuff github-netlify-example.
That’s the name of the computer I’m using, and the folder this terminal is in (my project folder). Now we can type the following command:
You might see some scary yellow text, but that doesn’t matter. The repo was initialized, which is all we need.

If you don’t already have a Github account, go create one now.
Next, download the Github Desktop app.
Open the app and in the GitHub Desktop drop-down menu, click Preferences. In the preferences window, click Accounts and follow the steps to sign in.
Once you've successfully signed in, in the drop-down menu:

Find the folder your project is in and then click Add Repository.

You should then see your project and all of the files Github recognized.

Since I’m on a MAC, Github recognized the hidden .DS_Store file, which I don’t want to add to Github.
You can either uncheck the box in front of it or add a file to your project’s root folder called .gitignore with the name of the file in it. I’m going to do the latter so I don’t have to uncheck that box every time I want to push changes in my project.
After adding the .gitignore file to my project, you should see it in the Github desktop app and the .DS_Store, or whatever other file(s) you want to remove disappear.

Click Publish Repository in the top right corner (see screenshot above).
Change the name if you want your project in your Github account under a different name, and make sure to check the “Keep this code private”… otherwise it’ll be displayed publicly for anyone on Github to see.
Click that blue button labeled Publish Repository.

Oops. It didn’t work. You probably got the error, “Cannon publish unborn HEAD”.
With Github, you have to “commit” your changes before you can publish them. Let’s do that.

In the lower left-hand corner, there’s a summary and description you can fill in. The summary is required and is like a quick note of what you did. If you’d like to write a lot of detail about what you did so you can reference it in the future you might use the description.
I personally just use the summary.
With at least the summary filled in, click Commit to master.
Now you can publish it again as I showed you above. If all goes well you should see it in your Github account.
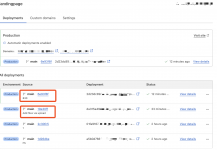
Inside your Netlify account on the main page after logging in click Add new site and Import an existing project.

Select Github and do the authorization.

Select your repo:

Most people won’t have to do anything on the 3rd step except click Deploy site.

My “site” was deployed in 8 seconds. It’s usually quite fast.
Now, if you want to add a custom domain, I’ll ask that you reference my original post, as it’s all the same.
The only difference now is that when you push any changes to your Github repo, your site will be automatically redeployed on Netlify with those changes. However, since we’re using Cloudflare, the cache will still need to be cleared... manually
Let’s make that automatic too…

Then click Go to the plugins directory.
Find the plugin, Cloudflare Cache Purge, and click Install.

Now you’ll need to configure the plugin.
The following was taken from the plugin’s docs:
From Cloudflare, you'll need:

Boom!
Now you can spend more time doing other things than wasting time moving files around, clearing caches, and making mistakes in the process.
Just push your code to Github, wait about 10 seconds, and everything is updated.
That’s great, but what if I told you it can get even better?
In this thread, I’m going to show you how you can add Github into the mix, allowing you to never have to visit Netlify (or Cloudflare) when you change or upload new files.
Note: this guide is assuming you are using VS Code as your code editor. If you’re not, I can’t help you.
Making a Github Repository
For this example, I’m going to have a single landing page (the “iphone” folder), within my main “project” folder called GITHUB-NETLIFY-EXAMPLE.When I say project, I mean the main folder that holds all of your landing pages. This main folder can have one folder with a landing page as I have, or literally hundreds of folders each containing a different landing page. The choice is yours.
Now we’re ready to turn this folder into a Git repository.
With your project open, in the main menu of VS Code:
- Navigate to the Terminal menu
- Click New Terminal
Your main window should split and you should see the terminal:
If you look at the text in the terminal, it says blurry stuff
github-netlify-example.Note: This next part may require installing Git to your machine. I can not and will not provide any support regarding this because it’s far too time intensive to figure out what your machine is, your OS, and all the jazz. If that's too complicated, then you might just do this instead and move your files as need. If you do that alternative option, the following steps will be slightly different.
That’s the name of the computer I’m using, and the folder this terminal is in (my project folder). Now we can type the following command:
Bash:
git initYou might see some scary yellow text, but that doesn’t matter. The repo was initialized, which is all we need.
Download Github Desktop
If you’re skilled, you can just use Github 100% with the terminal, but since I’m not I’ll be showing you how to set this up with Github Desktop, which gives you a visual interface. This way, you don’t have to remember all these “git …” commands and accidentally do something you didn’t want to in the terminal.If you don’t already have a Github account, go create one now.
Next, download the Github Desktop app.
Open the app and in the GitHub Desktop drop-down menu, click Preferences. In the preferences window, click Accounts and follow the steps to sign in.
Once you've successfully signed in, in the drop-down menu:
- Click File
- Click Add Local Repository
Find the folder your project is in and then click Add Repository.
You should then see your project and all of the files Github recognized.
Since I’m on a MAC, Github recognized the hidden .DS_Store file, which I don’t want to add to Github.
You can either uncheck the box in front of it or add a file to your project’s root folder called .gitignore with the name of the file in it. I’m going to do the latter so I don’t have to uncheck that box every time I want to push changes in my project.
After adding the .gitignore file to my project, you should see it in the Github desktop app and the .DS_Store, or whatever other file(s) you want to remove disappear.
Click Publish Repository in the top right corner (see screenshot above).
Change the name if you want your project in your Github account under a different name, and make sure to check the “Keep this code private”… otherwise it’ll be displayed publicly for anyone on Github to see.
Click that blue button labeled Publish Repository.
Oops. It didn’t work. You probably got the error, “Cannon publish unborn HEAD”.
With Github, you have to “commit” your changes before you can publish them. Let’s do that.
In the lower left-hand corner, there’s a summary and description you can fill in. The summary is required and is like a quick note of what you did. If you’d like to write a lot of detail about what you did so you can reference it in the future you might use the description.
I personally just use the summary.
With at least the summary filled in, click Commit to master.
Now you can publish it again as I showed you above. If all goes well you should see it in your Github account.
Creating a Netlify Site from Your Github Repo
Now let’s make a site in Netlify using that Github repo we just created.Inside your Netlify account on the main page after logging in click Add new site and Import an existing project.
Select Github and do the authorization.
Select your repo:
Most people won’t have to do anything on the 3rd step except click Deploy site.
My “site” was deployed in 8 seconds. It’s usually quite fast.
Now, if you want to add a custom domain, I’ll ask that you reference my original post, as it’s all the same.
The only difference now is that when you push any changes to your Github repo, your site will be automatically redeployed on Netlify with those changes. However, since we’re using Cloudflare, the cache will still need to be cleared... manually
Let’s make that automatic too…
Auto-Purge the Cloudflare Cache
On your site’s page inside your Netlify account, navigate to the Plugins page with the menu at the top:Then click Go to the plugins directory.
Find the plugin, Cloudflare Cache Purge, and click Install.
Now you’ll need to configure the plugin.
The following was taken from the plugin’s docs:
From Cloudflare, you'll need:
- Your Zone ID. Go to your Cloudflare dashboard, enter your website, and look in the bottom right-hand corner under 'API'.
- An API Token
API TOKEN - Instructions for creating new Cloudflare API Token
- In Cloudflare, navigate to My Profile --> API Tokens
- Click Create Token Button
- Click Custom Token Section --> Create Custom Token --> Get Started Button
- On the Create Custom Token Page:
- Token Name --> Netlify Purge Cache Token (or anything other name that is meaningful to you)
- Permissions --> Zone --> Cache Purge --> Purge
- Click Continue to Summary button
- Click Create Token Button
- Record the API Token to your password safe of choice. This is the last time you will have an opportunity to see this token.
API TOKEN - Instructions for configuring Netlify
In Netlify, go to Settings -> Build & Deploy -> Environment -> Environment variables and set up:- CLOUDFLARE_ZONE_ID
- CLOUDFLARE_API_TOKEN
Boom!
Now you can spend more time doing other things than wasting time moving files around, clearing caches, and making mistakes in the process.
Just push your code to Github, wait about 10 seconds, and everything is updated.
Last edited by a moderator:
 . Now, click on the check button:
")