

- Joined
- Sep 11, 2018
- Messages
- 77
Checklist for launching campaigns from MegaPu.sh
At first sight setting up an advertising campaign in Megapush is easy. But many beginners and sometimes the professionals have a lot of questions.
Here is the screenshot of the window of creating a campaign:
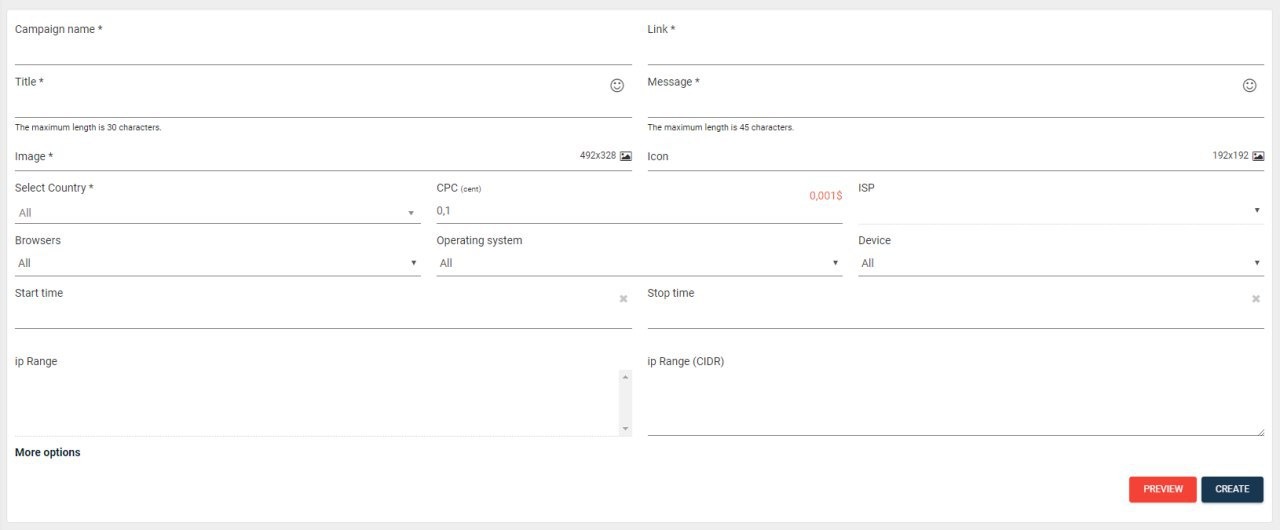
Really looks simple. Let's go through all the items in order:
At first sight setting up an advertising campaign in Megapush is easy. But many beginners and sometimes the professionals have a lot of questions.
Here is the screenshot of the window of creating a campaign:
Really looks simple. Let's go through all the items in order:
- Campaign name. Here we give a name to the campaign understandable for us. The name can be in both Russian and English. At our convenience. I recommend to use the subid in the title, which you pass to the affiliate / tracker. Then it will be more convenient to look in the list when you compare the data with the data from the affiliate.
- Link. All is clear: we insert the link from an Affiliate Program. Do not forget to put tags, subkeys and macros. (To give a beautiful view to the link is not necessary, the system will show its domains in the dispatch).
- Subject. This is the title of our push notification. The maximum length is 30 characters. For one GEO and one offer it should always be unique. Otherwise you’ll not pass the moderation.
- Message. This is the content of our push notification. The maximum length is 45 characters. The same messages are allowed on different campaigns.
- Picture. It has a required size of 492x328. On most desktops it will be displayed just under our message, so if you choose only desktop traffic, pay more attention to the picture. For most mobile devices, the picture will turn around after a click on the message.
- Icon. It has an optional character. The size is 192x192. It will be displayed in the miniature, next to our message. If you do not set an icon, then our picture will be loaded into the thumbnail.
- Let choose a country.
- Now let set a bid on which we will receive clicks. The bid is indicated in cents. The system shows us the minimum possible cost of a click and the average cost for a given GEO. Besides, during the setting process of the bid the system shows us which percent of users are being sent our push notifications. I must say that if there is no high competition for the GEO there is no sense to set the bid more than x3 from the recommended price. As the maximum possible number of sent notifications for one campaign is 3%.
- Further there are no required fields - let look at them briefly. ISP- a parameter that allows you to target your campaign by a particular operator. It can greatly narrow the reach of your audience.
- Browsers. It’s a browser target that you can select only one. If you need several, you will have to duplicate the campaign and choose additional browsers
- Operating system: target OS for our user. Again you can choose only one.
- Device. It is a target by the type of device: mobile or desktop. You can leave all. But I recommend to create two different campaigns for each type of traffic. Results may vary significantly.
- Start time and stop time. Here you can set the schedule of the work your campaign. Time is specified by the time zone of the GEO on which the campaign is being created.
- ip Range. Here you can specify the ranges of IP addresses for sending push notifications. You can use it differently, most often it is used with ads of wap subscriptions. The range is set up in the format 100.90.250.0/24. Each range from a new line.
- Below you can choose additional networks of push-traffic. All are included by default, so if you do not need them, do not forget to remove the checkmarks.
- By clicking on Additional Features, a menu opens in which you can set limits for your campaign.You can set the limit by budget, by the number of clicks, by ROI, and by profit. It should be noted that not always the user immediately opens our push notifications.Therefore, when you stop the campaign clicks they will keep going for a while. So, set the limit taking into consideration this factor.
Thereon that all the fields are completed we can see how our push looks like. If everything is fine, then we send the campaign to moderation.That's all. Our campaign is ready.
Not a big life hack: as most of you know, in order to successfully pour traffic from Megapu.sh, one campaign is not enough. As a rule, there should be at least 10 campaigns per offer. To quickly create a campaign, the browser button "Go back" will help us. After the first campaign is created and sent to moderation, we use this button and again get to the campaign creation window, but with the fields already filled in. It remains only to change the headings and pictures and the next campaign is ready. Either before sending the campaign to the moderation we can use the chrome function to "duplicate" the tab and get the same effect.

")