


- Joined
- Dec 1, 2018
- Messages
- 3,480
As you have probably noticed I have been posting on various threads about Prosper202 and have even helped out a few members with their setup of Prosper202, so it wasn’t really a great surprise when Luke asked if I’d be interested in creating a Prosper202 setup guide for the community. What with the current climate and being on lockdown like the rest of the world I have a tad more time than I normally would have so thought, “Sod it, why not! Challenge accepted”.
After I began to collate all my notes that I had taken over the past few weeks during own my tests I soon realised that this was probably going to be a long post. Don’t get me wrong it’s not an overly complex thing to set up a VPS to run Prosper202, like anything it’s just a matter of completing the various steps to arrive at the required outcome. However, to compile a guide to show all these steps is not so simple or brief!
Now I guess I could have just made some bits a pre-requisite but then you would have to look elsewhere to find out how to do that bit and there is no guarantee you would follow the same process as me which could mean that you may face issues trying to follow my guide. So despite the rabbit hole expanding at a rate of knots I went all in and started at the beginning and went through to the end, just like any good story
I have tried to be as clear as I can and not stray too much from the main aim so I hope it’s helpful and useful to members without being too long or overly boring and going over things that you really don’t want to know. Indeed you may feel that you can just skip parts as you know what you’re doing and that is fine, after all, time is money and money is time.
This guide is based on my own personal experience installing and setting up Prosper202. I’m not associated with them, I just think it’s a great piece of software plus the fact I love to tinker with servers and all things web-based, usually at the expense of me actually doing any real work!
This guide will centre on CentOS v8, not only because I have been using CentOS for many years now and have built up a good understanding of it but the fact it’s a rock-solid platform on which to host web-based systems. I also use nginx in this guide as I feel that for this specific use case it’s a better choice than apache (as for the most part members would be utilising lower-end VPS’s with limited memory which is where nginx shines over apache).
In addition to CentOS and nginx, I will be installing MariaDB, PHP 7.2 and components plus I will also utilise Let’s Encrypt to secure my server with SSL. Let’s Encrypt is an awesomely free way to get your sites and landers secured with SSL, but more on that later.
I’ll try to be as clear as I can be and go step-by-step, so you can follow along and build your very own Prosper202 server all by yourself but please do post questions and comments which I’ll do my best to answer and if necessary update the guide.

Due to the size of the guide, I will break it into several posts
Part 1 - This post silly
Part 2 - Setting up the VPS
Part 3 - Install MariaDB repo and software
Part 4 - Installing PHP & required components and Configuring our DB
Part 5 - Uploading and Installing Prosper202
Right with further ado let’s get going....
Prerequisites
There are a few things that I need to mention before I get to the guide, you will need some software to connect to the VPS, the Prosper202 files & API, a domain name and of course a VPS.
Connecting to a VPS
I will not go into great detail here as this long post would end up being a MAHOOSIVE post. There isn’t any benefit for this guide discussing the merits of different software, so suffice to say you need to connect to the VPS to run commands and upload files.
I mostly use PuTTY which is an open-source SSH and telnet client and WinSCP when I’m on my desktop as it’s a windows machine
https://www.chiark.greenend.org.uk/~sgtatham/putty/latest.html
https://winscp.net/eng/download.php
And on my MacBook, I tend to use iTerm and Cyberduck
https://iterm2.com/downloads.html
https://cyberduck.io/download/
But you should use whatever software you have installed or are most comfortable with.
Prosper202 API Key and download
Obviously, we need the Prosper202 files but we will also need an API key, the good news is that it’s all free; just create an account on the Prosper202 site.
https://my.tracking202.com/api/customers/register
Just fill out the form and submit it, when you are logged into the customer portal you can download the files required for the install, grab them and keep them safe. You will need them later.

You can view your API from the settings page but you do not need to worry about that at this stage, just ensure you create your account which will create your API and download the files.
Domain Name
You are going to need a domain name to set up your Prosper202 server, so head over to your favourite domain reseller. I predominately use Namecheap but you can use whomever you normally do just go grab yourself a domain before we begin.
https://www.namecheap.com/
Vultr VPS
As you are going to set up Prosper202 on a VPS you will obviously need a VPS!
I use both Digitalocean and Vultr for my VPS needs, although I tend to lean towards Vultr more as they’re slightly cheaper and I just prefer them tbh so I will use Vultr for this guide. I may do a Digitalocean section if people request it later as there are a few extra steps but for now, we’ll just focus on Vultr. Unless you know that you will be sending millions of hits right off the bat, I would suggest you start with a basic plan with 1GB RAM and 1 CPU. You can always upgrade this later if you need to.
Creating our VPS
Sign up to Vultr and create a new account or log in to your existing one. If you are signing up consider using my affiliate link you get $100 to play with https://www.vultr.com/?ref=8400333-6G
When you log in it should automatically load the Products page, if not click Products on the left-hand side.

If you have used Vultr before you know what is next but if not you will need to click on the blue circle on the right which will take you to Deploy New Instance page. On this page click Cloud Compute and choose your location, I suggest choosing a location as close to your target audience as possible to minimise latency, for the purpose of this guide I will select Dallas, US.

Scroll down to Server Type and select CentOS 8 x64 then under Server Size select 25GB SSD $5/mo

Leave the Additional Features as default (unchecked) and for server hostname, I usually use the prefix srv, so as I’m going to be using 202ts.xyz as my domain my hostname will be srv.202ts.xyz.

Personally I always like to take a second to double-check what I have just done before finalising anything to make sure I’ve not missed something or made any mistakes, so take a sec to review everything then click deploy.
Once you have clicked Deploy you will be taken back to the products page and will see your new VPS is installing.

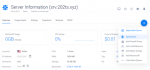
When the VPS has completed you need to assign the domain name to it, click on its name (srv.202ts.xyz) to view the Server Information page, then click on the
 icon next to the IP Address to copy the IP to the clipboard.

Once you have copied the IP to the clipboard, hover the mouse over the blue circle and select the second option Add Domain

Then paste the IP into the Default IP address box and enter your domain name in the Domain box then click Add.

This will create the relevant DNS entries on the Vultr name servers, now for it to work you will need to go back to your domain provider and update the name servers to point to the Vultr ones (ns1.vultr.com & ns2.vultr.com) so it will work.
I’m using Namecheap so in my Dashboard I just click MANAGE on the right of the domain

Then scroll down to NAMESERVERS select Custom DNS, set Nameserver 1 and Nameserver 2 to ns1.vultr.com & ns2.vultr.com and click the green tick.

My domain 202ts.xyz is now pointing at my VPS, it will take a little while for the DNS to propagate around the internet which is why you should always do this before you begin so hopefully by the time you need it it’s ready to go.
Now that’s the basics done we’re ready to get started on actually installing software on our new VPS which continues in the next post
After I began to collate all my notes that I had taken over the past few weeks during own my tests I soon realised that this was probably going to be a long post. Don’t get me wrong it’s not an overly complex thing to set up a VPS to run Prosper202, like anything it’s just a matter of completing the various steps to arrive at the required outcome. However, to compile a guide to show all these steps is not so simple or brief!
Now I guess I could have just made some bits a pre-requisite but then you would have to look elsewhere to find out how to do that bit and there is no guarantee you would follow the same process as me which could mean that you may face issues trying to follow my guide. So despite the rabbit hole expanding at a rate of knots I went all in and started at the beginning and went through to the end, just like any good story
I have tried to be as clear as I can and not stray too much from the main aim so I hope it’s helpful and useful to members without being too long or overly boring and going over things that you really don’t want to know. Indeed you may feel that you can just skip parts as you know what you’re doing and that is fine, after all, time is money and money is time.
This guide is based on my own personal experience installing and setting up Prosper202. I’m not associated with them, I just think it’s a great piece of software plus the fact I love to tinker with servers and all things web-based, usually at the expense of me actually doing any real work!
This guide will centre on CentOS v8, not only because I have been using CentOS for many years now and have built up a good understanding of it but the fact it’s a rock-solid platform on which to host web-based systems. I also use nginx in this guide as I feel that for this specific use case it’s a better choice than apache (as for the most part members would be utilising lower-end VPS’s with limited memory which is where nginx shines over apache).
In addition to CentOS and nginx, I will be installing MariaDB, PHP 7.2 and components plus I will also utilise Let’s Encrypt to secure my server with SSL. Let’s Encrypt is an awesomely free way to get your sites and landers secured with SSL, but more on that later.
I’ll try to be as clear as I can be and go step-by-step, so you can follow along and build your very own Prosper202 server all by yourself but please do post questions and comments which I’ll do my best to answer and if necessary update the guide.
Due to the size of the guide, I will break it into several posts
Part 1 - This post silly
Part 2 - Setting up the VPS
Part 3 - Install MariaDB repo and software
Part 4 - Installing PHP & required components and Configuring our DB
Part 5 - Uploading and Installing Prosper202
Right with further ado let’s get going....
Prerequisites
There are a few things that I need to mention before I get to the guide, you will need some software to connect to the VPS, the Prosper202 files & API, a domain name and of course a VPS.
Connecting to a VPS
I will not go into great detail here as this long post would end up being a MAHOOSIVE post. There isn’t any benefit for this guide discussing the merits of different software, so suffice to say you need to connect to the VPS to run commands and upload files.
I mostly use PuTTY which is an open-source SSH and telnet client and WinSCP when I’m on my desktop as it’s a windows machine
https://www.chiark.greenend.org.uk/~sgtatham/putty/latest.html
https://winscp.net/eng/download.php
And on my MacBook, I tend to use iTerm and Cyberduck
https://iterm2.com/downloads.html
https://cyberduck.io/download/
But you should use whatever software you have installed or are most comfortable with.
Prosper202 API Key and download
Obviously, we need the Prosper202 files but we will also need an API key, the good news is that it’s all free; just create an account on the Prosper202 site.
https://my.tracking202.com/api/customers/register
Just fill out the form and submit it, when you are logged into the customer portal you can download the files required for the install, grab them and keep them safe. You will need them later.
You can view your API from the settings page but you do not need to worry about that at this stage, just ensure you create your account which will create your API and download the files.
Domain Name
You are going to need a domain name to set up your Prosper202 server, so head over to your favourite domain reseller. I predominately use Namecheap but you can use whomever you normally do just go grab yourself a domain before we begin.
https://www.namecheap.com/
Vultr VPS
As you are going to set up Prosper202 on a VPS you will obviously need a VPS!
I use both Digitalocean and Vultr for my VPS needs, although I tend to lean towards Vultr more as they’re slightly cheaper and I just prefer them tbh so I will use Vultr for this guide. I may do a Digitalocean section if people request it later as there are a few extra steps but for now, we’ll just focus on Vultr. Unless you know that you will be sending millions of hits right off the bat, I would suggest you start with a basic plan with 1GB RAM and 1 CPU. You can always upgrade this later if you need to.
Creating our VPS
Sign up to Vultr and create a new account or log in to your existing one. If you are signing up consider using my affiliate link you get $100 to play with https://www.vultr.com/?ref=8400333-6G
When you log in it should automatically load the Products page, if not click Products on the left-hand side.
If you have used Vultr before you know what is next but if not you will need to click on the blue circle on the right which will take you to Deploy New Instance page. On this page click Cloud Compute and choose your location, I suggest choosing a location as close to your target audience as possible to minimise latency, for the purpose of this guide I will select Dallas, US.
Scroll down to Server Type and select CentOS 8 x64 then under Server Size select 25GB SSD $5/mo
Leave the Additional Features as default (unchecked) and for server hostname, I usually use the prefix srv, so as I’m going to be using 202ts.xyz as my domain my hostname will be srv.202ts.xyz.
Personally I always like to take a second to double-check what I have just done before finalising anything to make sure I’ve not missed something or made any mistakes, so take a sec to review everything then click deploy.
Once you have clicked Deploy you will be taken back to the products page and will see your new VPS is installing.
When the VPS has completed you need to assign the domain name to it, click on its name (srv.202ts.xyz) to view the Server Information page, then click on the
Once you have copied the IP to the clipboard, hover the mouse over the blue circle and select the second option Add Domain
Then paste the IP into the Default IP address box and enter your domain name in the Domain box then click Add.
This will create the relevant DNS entries on the Vultr name servers, now for it to work you will need to go back to your domain provider and update the name servers to point to the Vultr ones (ns1.vultr.com & ns2.vultr.com) so it will work.
I’m using Namecheap so in my Dashboard I just click MANAGE on the right of the domain
Then scroll down to NAMESERVERS select Custom DNS, set Nameserver 1 and Nameserver 2 to ns1.vultr.com & ns2.vultr.com and click the green tick.
My domain 202ts.xyz is now pointing at my VPS, it will take a little while for the DNS to propagate around the internet which is why you should always do this before you begin so hopefully by the time you need it it’s ready to go.
Now that’s the basics done we’re ready to get started on actually installing software on our new VPS which continues in the next post
Attachments
Last edited: