


- Joined
- Dec 1, 2018
- Messages
- 3,480
Way back in 2021 I wrote a post on how to setup CPVLab on a VPS which you can read here
 afflift.com
As you may know I attended iGB London again this year and met up with Radu from CPVLab, we discussed his great self-hosted tracker at some length. I think he was a little surprised at my seemingly in-depth understanding of how the licensing worked and when it changed after he took over from the original product many years ago.
He also told me about the upcoming new release (version 10), which sounded pretty damn good, and that he had now added support for PHP 8.1. If you know anything about PHP and protection like IonCube, you'd know that for some reason, PHP 8.0 was never actually supported, so like lots of other developers, they had to wait until 8.1 for IonCube to finally start supporting the PHP 8.x branch, although they still don't support 8.0?
But that's another topic of discussion and unrelated to this guide, so let's move on!
During our chats, I mentioned that a few members had been trying to follow my old guide and that it seemed like a good time to do a new guide focused on the latest OS's that have since replaced CentOS since its retirement.
I have been doing a lot with Rocky and AlmaLinux recently, so I thought, sod it let's do a new guide with the new version of CPVLab, I'm sure someone would find it helpful. And, anyway, even if no one does, I get to write some scripts and do what I'm good at for a bit.
So I come up with 2 scripts, the first on will build a LEMP server and the second one will install and configure CPVLab for you, awesome eh?
Here's a quick break down of what this LEMP script does

Quick break down of the CPVLab script
Which will display the help like this

I will be using Vultr for this guide but I have tested the scripts on Digital Ocean, Hetzner and Vultr on both Almalinux and Rocky Linux v9 so you can use any of those with confidence. I may add guide for DO and Hetzner if I get a chance but the scripts are the main thing.

You will then want to select Cloud Compute

You could choose Optimized Cloud Compute but those servers start at $28 a month!
Under CPU & Storage Technology I usually just leave it on AMD High Performance, but Intel High Performance would work just as well. Intel High Frequency would work OK but for the extra buck I just go with one of the High Performance ones.

Select the Server Location nearest to your visitors, for this guide I’m just selecting London UK as it’s the best damn city in the world

You want to select AlmaLinux v9 x64 under Server Image (or if you prefer Rocky Linux v9 x64) but I have started to lean towards AlmaLinux which is more to do with how I see the project rather than anything else as they are pretty much the same thing!

Now I have been testing this one with the smallest server size which is $6 a month which should be fine for most users, however, if you’re running millions of hits a day to it then you’ll probably find it can’t keep up so bear that in mind when selecting the size and choose accordingly!

I don’t have backups running on my VPS’s unless I really need it so usually switch this off, plus it saves $1.20 a month. Click the slider it will popup a message, just tick the I understand the risks and click Disable Auto Backups.

You don’t need any Additional Features or SSH Keys so just skip passed those to the Server Hostname & Label section. I tend to like short names for servers 3 or 4 chars so something like srv or trk etc., it should automatically fill out the label section when you enter the hostname

Now just double-check the summary at the bottom, make sure you only have 1 server and it’s $6 (unless you went with a bigger one or left backups on etc.) and click Deploy Now.

It will take you to the products page where you’ll see it’s installing

Once it’s finished, it will show you the IP address, and the status will be Running

Now just click on the server’s name to go to the details page where you can get the IP and password for root; just click the icon next to the IP to copy it and make a note, and do the same with the password.

Now you’ll need to fire up putty (or you choice of SSH client), enter the copied IP address into the Host Name (or IP Address) field, make sure you click SSH and the port is 22 then click Open.

It will open a connection to your server and popup Security Alert message about the server’s host key, we know its fine as we just built it so click Accept, this will store the key and will not ask you again.

It will then connect you to the console at login as: type in root, then copy the password and right click anywhere in the black section to paste the password and simply hit enter.

You’ll probably see at least one failed login attempt from an IP address you don’t know, that is normal as there are sad people out there constantly scanning ranges of IP addresses to try to compromise them! But don’t worry we can change the SSH port later on which makes it a bit harder for them
Now we have a VPS deployed and logged in we need to get the LEMP build script on there, well unless you want to type each command by hand…… lol
This will open the vi editor with a blank file called lemp.sh, now push the i or INS button to enable INSERT mode, you know it’s done it as it will show you at the bottom.

Now open the script in Visual Studio Code (or whatever text editor you use), select it all and copy it.

Once you have the script in the clipboard right click anywhere on the black screen to paste it into the file.

It should say 360,48 (the number of lines in the file) in the bottom left of the screen, now hit the escape button, the – INSERT – will disappear then shift plus colon, and type wq and hit enter, this will save the file and exit the vi editor.


As you can see there are a couple of switches, the main one is -d which is the domain name you want to set up, but you can set SELinux to enforcing/permissive (disabled by default, i.e. no switch!) and change the SSH port number. For example, to install LEMP on yourdomain.com, SELinux disabled and change the SSH port to 22335 you would use the following:
NOTE: I have been playing with SELinux but it’s not working quite right with CPVLab atm so I suggest leaving it disabled for the time being, after all your only going to have one user and isn’t that much advantage to having it enabled anyway. However, I will take some time to look into this a little more deeply at a later date to try and get it working properly.
Once you kick off the script it will display what it’s doing as it goes and shouldn’t take very long at all, once it’s complete it will ask you if you want to reboot. I would suggest rebooting at this point, as it will ensure everything is working correctly before we move on to the next stage but you can skip reboot and install the next script.

If you decide not to reboot it will exit the script and warn you that you need to reboot to ensure things work as expected!

Now we need to create the CPVLab script so just repeat what we did earlier
Then copy the contents of the CPVLab script and paste into the file as before or of course just use WinSCP to upload the script. Once the script is on the server you run it in a similar fashion to the LEMP one but you'll need a couple extra things.

Once you have logged in scroll to the Latest: Version 10.0 section, on the left hand side near the bottom of this section you should see Get your API key here.

Click on the link and it will open a new section with your API Key, you may need to click the generate new API key button the first time you do this.

Copy the key as you will need it when you run the script.
In the past you needed to run the CPVLab install wizard and step through that to get it installed but my script now takes care of all that now so you just need to enter the details when launching and it will download and configure everything for you.
To launch the script you need to use bash as before, but this time you supply the domain name, email and API key, so look something like this
As before once the script is launched it will show you what its doing as it goes, there is a little error checking in the script but it's not fool proof so ensure you enter the correct details before launching!
This script creates a database, user and a couple of password which are displayed on screen as it works but are also saved in the log file cpvlab.log in the same folder as the script.
Once the script has completed it will drop to the command prompt and display the URL to login with the username and password.

Now the install is complete you just need to open the login page and enter the details the script provided.
There is one caveat though, if you didn't reboot after the LEMP script you may be shown an error 500 when opening the page rather than the login page!


It's OK don't panic, this is because SELinux is usually enforcing by default and although the script has disabled it a reboot is required for it to be completely disabled. So simply reboot the server and all will be well in the world again
Now login using the credentials provided by the script, the default password is changed by the script so remember to make a note of it!

And you will be greeted by your shinny new CPVLab tracker

I have tried to make these scripts to be as easy as possible to use and tested them thoroughly on DigitalOcean, Vultr and Hetzner but as with anything you could run into issues, if you do come across any issues or have any suggestions please let me know and I'll try to address them as quickly as I can.
Also, don't forget to reply here if you use these scripts and let me know how you get on with them.
CPVLab VPS Setup Guide 🤓 (with shared build scripts) 😎
Use this massive CPV Lab Pro setup guide to learn how to setup your CPV Lab Pro tracker.
afflift.com
As you may know I attended iGB London again this year and met up with Radu from CPVLab, we discussed his great self-hosted tracker at some length. I think he was a little surprised at my seemingly in-depth understanding of how the licensing worked and when it changed after he took over from the original product many years ago.
He also told me about the upcoming new release (version 10), which sounded pretty damn good, and that he had now added support for PHP 8.1. If you know anything about PHP and protection like IonCube, you'd know that for some reason, PHP 8.0 was never actually supported, so like lots of other developers, they had to wait until 8.1 for IonCube to finally start supporting the PHP 8.x branch, although they still don't support 8.0?
But that's another topic of discussion and unrelated to this guide, so let's move on!
During our chats, I mentioned that a few members had been trying to follow my old guide and that it seemed like a good time to do a new guide focused on the latest OS's that have since replaced CentOS since its retirement.
I have been doing a lot with Rocky and AlmaLinux recently, so I thought, sod it let's do a new guide with the new version of CPVLab, I'm sure someone would find it helpful. And, anyway, even if no one does, I get to write some scripts and do what I'm good at for a bit.
So I come up with 2 scripts, the first on will build a LEMP server and the second one will install and configure CPVLab for you, awesome eh?
The LEMP Script
If you don't already know LEMP stands for:- L - Linux Operating System
- E - Nginx Server
- M - MySQL Database (or in this case MariaDB)
- P - PHP
Here's a quick break down of what this LEMP script does
- Update server and install required utilities
- Harden SSH and change port (if switch used)
- Install and configure nginx using mainline version (basically the latest version from nginx)
- Install and configure MariaDB from source so the latest version
- Install and configure PHP 8.1
- Install SSL certificate from Lets Encrypt
- Few tweaks to various components
- Setup custom error page (this is something I like to do to keep script kiddies guessing)
- Set SELinux settings for each component, although this is still not 100% so I suggest keeping it disabled for now!
The CPVLab Script
This script is quite different from any of my earlier CPVLab scripts, I spoke with Radu and asked him if he could allow downloading of the install files via an API request or something which he has enabled so now the script does pretty much everything for youQuick break down of the CPVLab script
- Update server and install required utilities
- Create database, user and complex password
- Install and configure IonCube
- Download and install CPVLab
- Set all relevant permissions
- Change default admin password
- Clean up install files
Bash:
bash lemp.sh -h

or

bash cpvlab.sh -h
Which will display the help like this
I will be using Vultr for this guide but I have tested the scripts on Digital Ocean, Hetzner and Vultr on both Almalinux and Rocky Linux v9 so you can use any of those with confidence. I may add guide for DO and Hetzner if I get a chance but the scripts are the main thing.
What you need
Right in order to setup a CPVLab VPS you are going to need a few things, here is a break down of what is required to use these scripts and install CPVLab on your very own VPS.- A domain name, you can get one anywhere but i tend to use NameCheap for mine, my ref link is https://namecheap.pxf.io/4PPGYo
- A CPVLab license which you can get here tell them Neil from AffLIFT sent you
- A VPS which you can get from anywhere but the main ones I use are
- vultr - Get $100 to test use this link https://www.vultr.com/?ref=9086637-8H
- DigitalOcean - Get $200 to test use this link https://m.do.co/c/86d726fe29de
- Hetzner - Get €20 to test use this link https://hetzner.cloud/?ref=s1BDrtcj51a
- Putty (or equivalent) which you can download here https://www.chiark.greenend.org.uk/~sgtatham/putty/latest.html
- WinSCP (or equivalent) which you can download here https://winscp.net/eng/download.php
- Some time and patience
Deploying a VPS on vultr.com
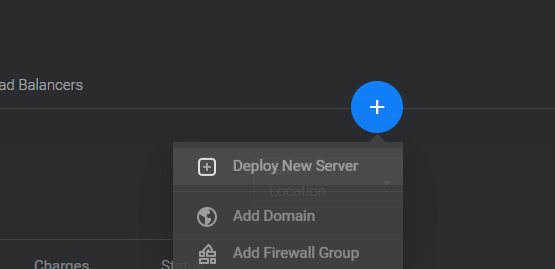
Login to your Vultr account, then click on Deploy Server or you can click the blue circle with a white plus sign, if you hover over the circle it will drop a menu select Deploy New Server from that.You will then want to select Cloud Compute
You could choose Optimized Cloud Compute but those servers start at $28 a month!
Under CPU & Storage Technology I usually just leave it on AMD High Performance, but Intel High Performance would work just as well. Intel High Frequency would work OK but for the extra buck I just go with one of the High Performance ones.
Select the Server Location nearest to your visitors, for this guide I’m just selecting London UK as it’s the best damn city in the world
You want to select AlmaLinux v9 x64 under Server Image (or if you prefer Rocky Linux v9 x64) but I have started to lean towards AlmaLinux which is more to do with how I see the project rather than anything else as they are pretty much the same thing!
Now I have been testing this one with the smallest server size which is $6 a month which should be fine for most users, however, if you’re running millions of hits a day to it then you’ll probably find it can’t keep up so bear that in mind when selecting the size and choose accordingly!
I don’t have backups running on my VPS’s unless I really need it so usually switch this off, plus it saves $1.20 a month. Click the slider it will popup a message, just tick the I understand the risks and click Disable Auto Backups.
You don’t need any Additional Features or SSH Keys so just skip passed those to the Server Hostname & Label section. I tend to like short names for servers 3 or 4 chars so something like srv or trk etc., it should automatically fill out the label section when you enter the hostname
Now just double-check the summary at the bottom, make sure you only have 1 server and it’s $6 (unless you went with a bigger one or left backups on etc.) and click Deploy Now.
It will take you to the products page where you’ll see it’s installing
Once it’s finished, it will show you the IP address, and the status will be Running
Now just click on the server’s name to go to the details page where you can get the IP and password for root; just click the icon next to the IP to copy it and make a note, and do the same with the password.
Now you’ll need to fire up putty (or you choice of SSH client), enter the copied IP address into the Host Name (or IP Address) field, make sure you click SSH and the port is 22 then click Open.
It will open a connection to your server and popup Security Alert message about the server’s host key, we know its fine as we just built it so click Accept, this will store the key and will not ask you again.
It will then connect you to the console at login as: type in root, then copy the password and right click anywhere in the black section to paste the password and simply hit enter.
You’ll probably see at least one failed login attempt from an IP address you don’t know, that is normal as there are sad people out there constantly scanning ranges of IP addresses to try to compromise them! But don’t worry we can change the SSH port later on which makes it a bit harder for them
Now we have a VPS deployed and logged in we need to get the LEMP build script on there, well unless you want to type each command by hand…… lol
Creating the Script
I find it easiest to create a file called lemp.sh on the VPS which you can do by typing the following:
Bash:
vi lemp.shThis will open the vi editor with a blank file called lemp.sh, now push the i or INS button to enable INSERT mode, you know it’s done it as it will show you at the bottom.
Now open the script in Visual Studio Code (or whatever text editor you use), select it all and copy it.
Once you have the script in the clipboard right click anywhere on the black screen to paste it into the file.
It should say 360,48 (the number of lines in the file) in the bottom left of the screen, now hit the escape button, the – INSERT – will disappear then shift plus colon, and type wq and hit enter, this will save the file and exit the vi editor.
Need something simpler?
You can of course just use WinSCP or any other file transfer software and copy the script over if you want to do less typing, but personally I think its good to get some exposure to the command line.Quick Test
I have changed the scripts quite a bit since the last guide so you could run with the -h switch to show you the usage/help which should confirm the script has copied OK.
Bash:
bash lemp.sh -hAs you can see there are a couple of switches, the main one is -d which is the domain name you want to set up, but you can set SELinux to enforcing/permissive (disabled by default, i.e. no switch!) and change the SSH port number. For example, to install LEMP on yourdomain.com, SELinux disabled and change the SSH port to 22335 you would use the following:
Bash:
bash lemp.sh -d yourdomain.com -p 22335NOTE: I have been playing with SELinux but it’s not working quite right with CPVLab atm so I suggest leaving it disabled for the time being, after all your only going to have one user and isn’t that much advantage to having it enabled anyway. However, I will take some time to look into this a little more deeply at a later date to try and get it working properly.
Once you kick off the script it will display what it’s doing as it goes and shouldn’t take very long at all, once it’s complete it will ask you if you want to reboot. I would suggest rebooting at this point, as it will ensure everything is working correctly before we move on to the next stage but you can skip reboot and install the next script.
If you decide not to reboot it will exit the script and warn you that you need to reboot to ensure things work as expected!
Now we need to create the CPVLab script so just repeat what we did earlier
Bash:
vi cpvlab.shThen copy the contents of the CPVLab script and paste into the file as before or of course just use WinSCP to upload the script. Once the script is on the server you run it in a similar fashion to the LEMP one but you'll need a couple extra things.
CPVLab Script requirements
- Domain name you used in the LEMP script
- Email used to purchase your CPVLab license
- API Key from CPVLab users area
Once you have logged in scroll to the Latest: Version 10.0 section, on the left hand side near the bottom of this section you should see Get your API key here.
Click on the link and it will open a new section with your API Key, you may need to click the generate new API key button the first time you do this.
Copy the key as you will need it when you run the script.
In the past you needed to run the CPVLab install wizard and step through that to get it installed but my script now takes care of all that now so you just need to enter the details when launching and it will download and configure everything for you.
To launch the script you need to use bash as before, but this time you supply the domain name, email and API key, so look something like this
Bash:
bash cpvlab.sh -d yourdomain.com -e [email protected] -a your_cpvlab_api_keyAs before once the script is launched it will show you what its doing as it goes, there is a little error checking in the script but it's not fool proof so ensure you enter the correct details before launching!
This script creates a database, user and a couple of password which are displayed on screen as it works but are also saved in the log file cpvlab.log in the same folder as the script.
Once the script has completed it will drop to the command prompt and display the URL to login with the username and password.
Now the install is complete you just need to open the login page and enter the details the script provided.
Code:
https://yourdomain.com/login.phpThere is one caveat though, if you didn't reboot after the LEMP script you may be shown an error 500 when opening the page rather than the login page!
It's OK don't panic, this is because SELinux is usually enforcing by default and although the script has disabled it a reboot is required for it to be completely disabled. So simply reboot the server and all will be well in the world again
Now login using the credentials provided by the script, the default password is changed by the script so remember to make a note of it!
And you will be greeted by your shinny new CPVLab tracker
I have tried to make these scripts to be as easy as possible to use and tested them thoroughly on DigitalOcean, Vultr and Hetzner but as with anything you could run into issues, if you do come across any issues or have any suggestions please let me know and I'll try to address them as quickly as I can.
Also, don't forget to reply here if you use these scripts and let me know how you get on with them.


